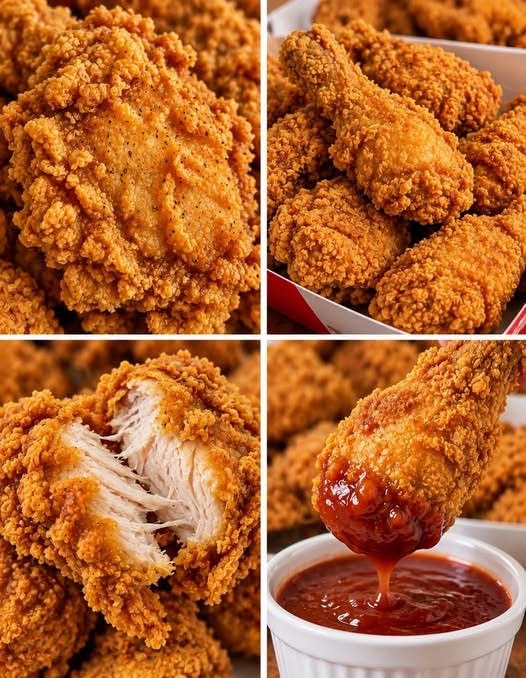
The Art and Science of Ultimate Crispy Fried Chicken
Achieving truly legendary, restaurant-quality fried chicken at home with a crust that shatters audibly at first bite and meat so impossibly juicy it practically melts-is equal parts culinary tradition and applied kitchen chemistry. While fast-food chains rely on commercial pressure fryers, you can replicate and even surpass those results using a heavy cast-iron skillet or a Dutch oven, standard pantry spices, and a few non-negotiable techniques.
This comprehensive guide takes you step-by-step through the process of building the ultimate batch of buttermilk-marinated, deeply seasoned, extra-crunchy fried chicken.
Comprehensive Ingredients List
To feed a hungry family or host a weekend gathering, this recipe utilizes one kilogram (roughly 2.2 pounds) of bone-in, skin-on chicken pieces. Bone-in cuts (such as thighs, drumsticks, and split breasts) are essential because the bones insulate the meat during the high-heat cooking process, keeping the interior succulent while the exterior develops its deep golden-brown crunch.
The Marinade (The Tenderizer)
- 1 kg chicken pieces (mixture of thighs, drumsticks, and wings)
- 1 cup buttermilk (shaken; the acidity gently denatures tough meat proteins)
- 1 tbsp hot sauce (adds a subtle background warmth without making the dish overtly spicy)
- 1 tsp salt (begins the internal seasoning process)
- 1 tsp black pepper (freshly ground is always preferred for maximum pungency)
- 1 tsp paprika (adds a mild, sweet earthy note and a hint of color)
- 1 tsp garlic powder (infuses a savory depth directly into the flesh)
The Crispy Coating (The Crunch)
- 2 cups all-purpose flour (forms the structural matrix of your crust)
- â…“ cup cornstarch (the secret weapon; cornstarch inhibits gluten development, resulting in a lighter, shatteringly crisp crust)
- 1 tbsp baking powder (creates microscopic gas bubbles within the flour layer, lifting the coating slightly for a multi-layered crunch)
- 1 ½ tsp salt (ensures the outer shell is as flavorful as the interior)
- 1 tsp black pepper
- 2 tsp paprika (or smoked paprika for a deeper, campfire-like aroma)
- 1 ½ tsp garlic powder
- 1 ½ tsp onion powder (rounds out the savory aromatics)
- 1 tsp cayenne pepper (optional; scale up or down depending on your preference for heat)
For Frying
- 3 to 4 cups high-smoke-point oil (peanut oil, canola oil, or refined vegetable oil)
Phase One: The Buttermilk Brine (Transformation Through Acid)
Never underestimate the power of a proper marinade. Simply tossing raw chicken into flour and dropping it into hot oil yields dry meat and a crust that easily peels away. The buttermilk bath is what separates amateur attempts from masterclass fried chicken.
- Inspect and Prepare the Chicken: Rinse your 1 kg of chicken pieces under cold water and pat them completely dry with paper towels. Trim off any excessive, loose flaps of skin or stray bits of fat, but keep the core skin intact—it acts as a moisture barrier and crisps up intensely during frying.
- Mix the Marinade: In a large mixing bowl or a heavy-duty, sealable zip-top plastic bag, whisk together the 1 cup of buttermilk, 1 tablespoon of hot sauce, 1 teaspoon of salt, 1 teaspoon of black pepper, 1 teaspoon of paprika, and 1 teaspoon of garlic powder until smooth and fully combined.
- Submerge and Soak: Add the chicken pieces to the liquid. Ensure every single piece is completely coated and submerged. If using a bag, press out the excess air and seal it tight.
- Refrigerate for Maximum Flavor: Place the bowl or bag into the refrigerator. While 30 minutes is the absolute bare minimum in an emergency, letting the chicken marinate for 4 to 8 hours (or even overnight) works wonders. The lactic acid in the buttermilk breaks down dense muscle fibers, rendering the meat buttery-soft, while the salt penetrates deep into the cellular structure to season the chicken from the inside out.
Phase Two: Engineering the Ultimate Crust
While your chicken is resting in the refrigerator, you can prepare the dry dredge. The ratio of all-purpose flour to cornstarch, combined with precise chemical leavening, guarantees a craggy, golden crust that holds its crunch even as the chicken cools slightly.
- Whisk the Dry Ingredients: In a wide, shallow dish or a large brown paper bag, combine the 2 cups of all-purpose flour, ⅓ cup of cornstarch, 1 tablespoon of baking powder, 1 ½ teaspoons of salt, 1 teaspoon of black pepper, 2 teaspoons of paprika, 1 ½ teaspoons of garlic powder, 1 ½ teaspoons of onion powder, and the optional cayenne pepper. Whisk or shake vigorously until all the spices are completely integrated into the flour.
- The Professional “Rough-Up” Technique (Optional Clumping): For extra craggy, ultra-crunchy crust flakes, take 2 tablespoons of your liquid buttermilk marinade and drizzle it directly into the dry flour mixture. Use a fork to work it into small, pebble-sized crumbs. These little bits will fry up into exceptionally crunchy nuggets attached to your chicken pieces.
Phase Three: The Dredge and Rest Ritual
The transition from wet marinade to dry flour requires a specific protocol to ensure the coating does not slide off the chicken mid-fry.
- Remove and Drip: Pull your chicken out of the refrigerator. Using tongs, lift a piece of chicken out of the buttermilk, allowing any heavy, pooling excess to drip back into the bowl for a few seconds. Do not wipe the chicken dry; you want a damp surface for the flour to cling to.
- Press and Coat: Drop the chicken piece into the seasoned flour mixture. Use your hands to thoroughly pack the flour all over the meat. Press down firmly so the flour bonds tightly with the wet surface.
- The Crucial Resting Period: Transfer the dredged chicken pieces onto a wire cooling rack set inside a baking sheet. Let the chicken rest undisturbed for 15 to 30 minutes. This is a secret step that many home cooks skip: as it rests, the dry flour absorbs the surface moisture from the buttermilk, turning into a tacky, paste-like layer. If you fry chicken immediately while the flour is still loose and powdery, the crust will slip right off the skin into the oil.
Phase Four: The Precision Frying Process
Frying chicken is an exercise in heat management. If your oil is too hot, the outside will burn to a crisp before the raw bone-in meat cooks through. If your oil is too cold, the chicken will absorb massive amounts of grease, resulting in a heavy, soggy, and unpalatable texture.
- Choose Your Vessel: Select a heavy-bottomed Dutch oven, a cast-iron skillet, or a dedicated deep electric fryer with high sides. Cast iron and heavy enameled cast iron are gold standards because they retain thermal mass exceptionally well, preventing wild temperature fluctuations when cold chicken hits the pan.
- Fill and Heat the Oil: Pour in your high-smoke-point oil (peanut or canola) until it reaches a depth of about 2 to 3 inches—deep enough to come halfway up the sides of your chicken pieces. Clip a deep-fry thermometer to the side of the pot. Turn the burner to medium-high and heat the oil until it stabilizes right at 340°F to 350°F (170°C to 175°C).
- Manage Batch Sizes (Never Overcrowd): Carefully lower the chicken pieces into the hot oil using tongs, working in small batches of 2 to 4 pieces max. Adding too much chicken at once causes the oil temperature to plummet instantly, ruining the crisping process. Drop similar-sized cuts together so they finish cooking at the same rate (e.g., fry all the drumsticks together, then separate the larger breasts or thick thighs).
- Monitor and Flip: Maintain the oil temperature between 320°F and 350°F throughout the cook by adjusting your burner flame. Cook the chicken undisturbed for the first 5 minutes to let the crust set firmly. Then, gently turn the pieces over using tongs.
- Cook to Safe Internal Temperatures: Bone-in chicken pieces typically require 12 to 15 minutes total of frying time, depending on their size. To guarantee food safety and absolute perfection, insert an instant-read digital thermometer into the thickest part of the meat without touching the bone; it should register a minimum internal temperature of 165°F (74°C).
Phase Five: Draining, Cooling, and Serving
The way you handle freshly fried chicken dictates whether it stays crispy or traps steam and turns soggy at the last second.
- Avoid Paper Towels (Direct Contact Traps Steam): While it is tempting to place hot fried chicken directly onto a bed of flat paper towels, doing so traps the escaping steam underneath the chicken. The moisture condenses, turning the bottom crust soggy. Instead, always transfer cooked chicken directly to a wire cooling rack set over a baking sheet. This allows air to circulate freely all 360 degrees around the piece, keeping the crust extraordinarily crisp.
- Immediate Seasoning: The exact moment the chicken comes out of the oil while the surface oil is still active, give the pieces a light dusting of flaky sea salt or fine kosher salt. The salt sticks immediately to the hot exterior, enhancing every single spice profile.
- Rest Before Eating: Allow the chicken to rest for 5 to 8 minutes before diving in. This brief cooling period lets the internal juices redistribute throughout the muscle fibers instead of running out onto your plate on the first cut.
Essential Pro-Tips for Troubleshooting
- Oil Smoking Too Fast? If your oil begins smoking aggressively, it is overheating past its smoke point. Turn off the heat immediately and let it cool down; burnt oil imparts a bitter, acrid taste to your delicate crust.
- Flaky and Falling Crust? If your flour coating falls off into the bottom of the pan, your oil temperature was likely too low initially, or you forgot to let the dredged chicken rest before frying. The resting phase is what locks the skin and coating together.
- Keeping Batches Warm: If you are cooking a large amount of chicken across multiple batches, keep your finished batches warm by placing the wire rack inside a preheated oven set to a low 250°F (120°C). Never cover the chicken tightly with foil, as this traps steam and ruins the crunch.
Serve hot alongside classic accompaniments such as honey, additional hot sauce, coleslaw, cornbread, or creamy potato salad for an authentic, unforgettable feast.